Hexo博客搭建笔记

多年的老年人间接性选择失忆综合症治疗笔记

前前后后捣鼓 Hexo+next+github 也有一小段时间了。折腾来折腾去也算花了些心力,为了怕多年的间接性选择失忆综合症(开玩笑)再犯,在此记录下相关的操作步骤。(本文中的操作全在 Win10 下实现)。

本站配置

  • 各项版本:
1
2
3
4
5
6
7
8
9
10
11
12
13
14
15
16
hexo: 3.4.2
hexo-cli: 1.0.4
os: Windows_NT 10.0.15063 win32 x64
http_parser: 2.7.0
node: 8.9.3
v8: 6.1.534.48
uv: 1.15.0
zlib: 1.2.11
ares: 1.10.1-DEV
modules: 57
nghttp2: 1.25.0
openssl: 1.0.2n
icu: 59.1
unicode: 9.0
cldr: 31.0.1
tz: 2017b
  • 功能组件:
    • Github Page
    • 文章加密访问功能
    • 页面顶部加载条功能
    • 集成 leancloud 文章阅读量统计功能
    • 源代码压缩功能
    • 阅读排行Top10统计功能
    • Gitment 评论系统 (原先使用来必力,发现不太和我口味,当然来必力也很好用)
    • 本地搜索功能

准备工作

在 Hexo 中有两份主要的配置文件,其名称都是 _config.yml。 其中,一份位于站点根目录下,主要包含 Hexo 本身的配置;另一份位于主题目录下,这份配置由主题作者提供,主要用于配置主题相关的选项。为了描述方便,在以下说明中,将前者称为 站点配置文件, 后者称为 主题配置文件

在本地搭建Hexo静态博客

1
2
3
4
5
npm install hexo-cli -g
hexo init blog
cd blog
npm install
hexo server

完成上述操作浏览器访问 http://localhost:4000/ 访问正常即创建成功。

配置Github Page

  • 登录Github
  • 创建一个新的项目(Start a project),命名为 yourgithubname.github.io 我的是 eibitme.github.io

yourgithubname 是的你的Github账号名称。

如果你还没有Github账号,请自行注册一个,在这里就不做演示了。

将本地博客与 Github Page 关联

  • 进入本地博客更目录使用文本编辑器编辑 _config.yml站点配置文件 中的 deploy
1
2
3
4
deploy:
type: git
repository: https://github.com/eibitme/eibitme.github.io.git
branch: master
  • 运行: npm install hexo-deployer-git --save (安装hexo git相关)
  • 运行: hexo g (本地生成静态文件)
  • 运行: hexo d (将本地静态文件推送至Github)

浏览器访问 https://eibitme.github.io/ 则可以看到你滴Blog了,惊不惊喜?意不意外?

基本信息设置

在根目录下的 _config.yml 站点配置文件 文件中,可以修改标题,作者等信息。打开编辑该文件,注意:每一个值的冒号后面都有一个半角空格!

捣鼓

本博客采用了 hexo-theme-next 本文内容均已 hexo-theme-next 为例。
进入 blog 根目录执行以下操作:

  • 下载主题:

    1
    git clone https://github.com/iissnan/hexo-theme-next themes/next
  • 打开 _config.yml 站点配置文件,将themes修改为next

  • 运行:
    1
    2
    3
    hexo clean
    hexo g
    hexo d

想了解其他 hexo 主题,请访问: 主题列表

想知道关于 next 主题,更多的配置,请参考:Next主题配置

在文章底部增加版权信息

编辑 主题配置文件 搜索 post_copyright, 将 enable: false 修改为 true

1
2
3
4
post_copyright:
enable: true
license: CC BY-NC-SA 3.0
license_url: https://creativecommons.org/licenses/by-nc-sa/3.0/

修改默认 _post 文章的md文件选项

在/scaffolds/post.md文件中添加:

1
2
3
4
5
6
7
8
9
---
title: {{ title }}
date: {{ date }}
tags:
categories:
copyright: true
comments: true
password:
---

对网页底部进行修改

编辑 主题配置文件 搜索 footer 修改其中的 theme 选项:

1
2
3
4
5
theme:
# Theme & scheme info link (Theme - NexT.scheme).
enable: false
# Version info of NexT after scheme info (vX.X.X).
version: false

文章加密访问

打开themes->next->layout->_partials->head.swig文件,在meta标签后面插入这样一段代码:

1
2
3
4
5
6
7
8
9
10
<script>
(function(){
if('{{ page.password }}'){
if (prompt('请输入文章密码') !== '{{ page.password }}'){
alert('密码错误!');
history.back();
}
}
})();
</script>

然后文章中添加:

1
password: password

添加顶部加载条

打开/themes/next/layout/_partials/head.swig文件,在maximum-scale=1”/>后添加如下代码:

1
2
<script src="//cdn.bootcss.com/pace/1.0.2/pace.min.js"></script>
<link href="//cdn.bootcss.com/pace/1.0.2/themes/pink/pace-theme-flash.css" rel="stylesheet">

但是,默认的是粉色的,要改变颜色可以在/themes/next/layout/_partials/head.swig文件中添加如下代码(接在刚才link的后面)

1
2
3
4
5
6
7
8
9
10
11
12
13
<style>
.pace .pace-progress {
background: #1E92FB; /*进度条颜色*/
height: 3px;
}
.pace .pace-progress-inner {
box-shadow: 0 0 10px #1E92FB, 0 0 5px #1E92FB; /*阴影颜色*/
}
.pace .pace-activity {
border-top-color: #1E92FB; /*上边框颜色*/
border-left-color: #1E92FB; /*左边框颜色*/
}
</style>

集成 leancloud && 添加热度

集成 leancloud 为NexT主题添加文章阅读量统计功能
next主题集成leanCloud,打开/themes/next/layout/_macro/post.swig

在”leancloud-visitors-count”> span 标签后面添加℃。

修改 <span class="post-meta-item-icon"> 里的 i 标签图标为 <i class="fa fa-thermometer-three-quarters"></i>

然后打开,/themes/next/languages/zh-Hans.yml,将visitors内容改为热度即可。

修改 tag 标签的 # 开头

修改模板/themes/next/layout/_macro/post.swig,搜索 rel=”tag”>#,将 # 换成 <i class="fa fa-tag"></i>

修改文章内超链接文本样式

将链接文本设置为蓝色,鼠标划过时文字颜色加深,并显示下划线。
找到文件 themes\next\source\css_custom\custom.styl ,添加如下 css 样式:

1
2
3
4
5
6
7
8
.post-body p a {
color: #0593d3;
border-bottom: none;
&:hover {
color: #0477ab;
text-decoration: underline;
}
}

博文压缩

在站点的根目录下执行以下命令:

1
2
npm install gulp -g
npm install gulp-minify-css gulp-uglify gulp-htmlmin gulp-htmlclean gulp --save

在博客根目录下新建 gulpfile.js ,并填入以下内容:

1
2
3
4
5
6
7
8
9
10
11
12
13
14
15
16
17
18
19
20
21
22
23
24
25
26
27
28
29
30
31
32
33
var gulp = require('gulp');
var minifycss = require('gulp-minify-css');
var uglify = require('gulp-uglify');
var htmlmin = require('gulp-htmlmin');
var htmlclean = require('gulp-htmlclean');
// 压缩 public 目录 css
gulp.task('minify-css', function() {
return gulp.src('./public/**/*.css')
.pipe(minifycss())
.pipe(gulp.dest('./public'));
});
// 压缩 public 目录 html
gulp.task('minify-html', function() {
return gulp.src('./public/**/*.html')
.pipe(htmlclean())
.pipe(htmlmin({
removeComments: true,
minifyJS: true,
minifyCSS: true,
minifyURLs: true,
}))
.pipe(gulp.dest('./public'))
});
// 压缩 public/js 目录 js
gulp.task('minify-js', function() {
return gulp.src('./public/**/*.js')
.pipe(uglify())
.pipe(gulp.dest('./public'));
});
// 执行 gulp 命令时执行的任务
gulp.task('default', [
'minify-html','minify-css','minify-js'
]);

生成博文是执行 hexo g && gulp 就会根据 gulpfile.js 中的配置,对 public 目录中的静态资源文件进行压缩。

搜索功能

  1. 安装 hexo-generator-searchdb,在站点的根目录下执行以下命令:

    1
    npm install hexo-generator-searchdb --save
  2. 编辑 站点配置文件,新增以下内容到任意位置:

    1
    2
    3
    4
    5
    search:
    path: search.xml
    field: post
    format: html
    limit: 10000
  3. 编辑 主题配置文件,启用本地搜索功能:

    1
    2
    3
    # Local search
    local_search:
    enable: true

增加阅读排行统计页面

首先我们可以使用leancloud来统计页面阅读数量,以及储存这些信息,然后通过leancloud提供的api编写js脚本来获取阅读数量信息,并展示在页面上。
首先新建一个page页面,hexo new page “topten”,然后编辑此.md文件,写下:

1
2
3
4
5
6
7
8
9
10
11
12
13
14
15
16
17
18
19
20
21
22
23
24
25
<div id="Top10"></div>
<script src="https://cdn1.lncld.net/static/js/av-core-mini-0.6.1.js"></script>
<script>AV.initialize("", ""); //需要写上leancloud的key</script>
<script type="text/javascript">
var time=0
var title=""
var url=""
var query = new AV.Query('Counter');//表名
query.notEqualTo('id',0); //id不为0的结果
query.descending('time'); //结果按阅读次数降序排序
query.limit(20); //最终只返回10条结果
query.find().then(function (todo) {
for (var i=0;i<10;i++){
var result=todo[i].attributes;
time=result.time; //阅读次数
title=result.title; //文章标题
url=result.url; //文章url
var content="<p>"+"<font color='#0477ab'>"+"【阅读次数:"+time+"】"+"<a href='"+"http://thief.one"+url+"'>"+title+"</font>"+"</a>"+"</p>";
// document.write("<a href='"+"http://thief.one/"+url+"'>"+title+"</a>"+" Readtimes:"+time+"<br>");
document.getElementById("Top10").innerHTML+=content
}
}, function (error) {
console.log("error");
});
</script>

添加 来必力 评论系统 (本站并不使用此功能)

登录 来必力 获取你的 LiveRe UID。 编辑 主题配置文件, 编辑 livere_uid 字段,设置如下:

1
livere_uid: #your livere_uid

使用 Gitment 做评论系统 (本站所使用)

在来必力的使用期间,发现这玩意有点卡卡的,emmm…可能是我自己的问题吧,总之我更换了个人认为更为方便的 gitment

Gitment 简介

Gitment 是作者实现的一款基于 GitHub Issues 的评论系统。支持在前端直接引入,不需要任何后端代码。可以在页面进行登录、查看、评论、点赞等操作,同时有完整的 Markdown / GFM 和代码高亮支持。尤为适合各种基于 GitHub Pages 的静态博客或项目页面。

项目地址: gitment

Demo Page: Demo

使用方法

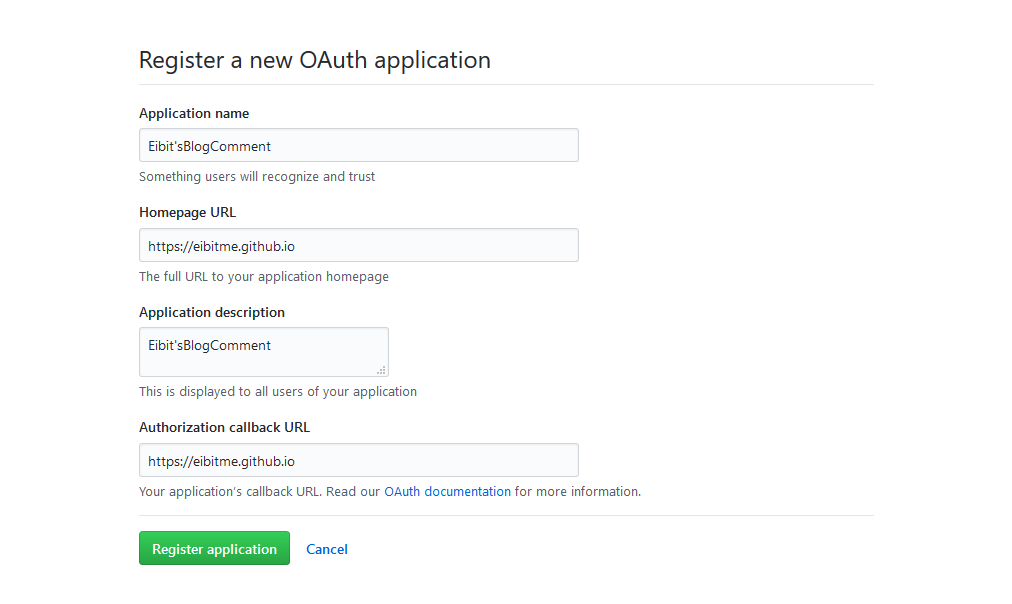
1.注册 OAuth Application

点击此处 来注册一个新的 OAuth Application。其他内容可以随意填写,但要确保填入正确的 callback URL(一般是评论页面对应的域名,如 https://eibitme.github.io)。

注册 OAuth Application

2.修改 主题配置文件 gitment 配置以下几项
1
2
3
4
5
6
gitment:
enable: true
github_user: *Your Github ID*
github_repo: *The repo you use to store Gitment comments*
client_id: *Github client id for the Gitment*
client_secret: *Github access secret token for the Gitment*

使用 Hexo Admin 编辑 markdown 文章

项目地址: Hexo Admin

Demo: Hexo Admin Demo

Quickstart:

1
2
3
npm install --save hexo-admin
hexo server -d
open http://localhost:4000/admin/

参考文章

https://thief.one/2017/03/03/Hexo搭建博客教程/